
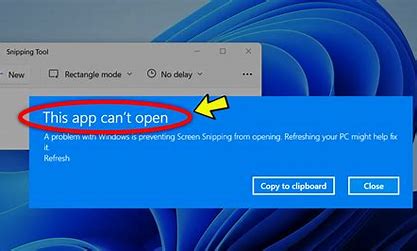
In this article, you will find out how to fix snipping tool not working. The Snipping Tool is an important feature of any Windows operating system; it allows users to capture, edit, and save screenshots directly onto their PC.
However, since Windows Vista, the program hasn’t been the most stable. Even as we moved onto Windows 10 and 11, the Snipping tool tended to run into strange issues.
Such issues prompt the “Snipping tool not working” error repeatedly, which might hinder your workflow and slow you down. We have tracked down a few reasons why the Snipping Tool can stop working and how to easily resolve them. Let’s have a look at how they can be dealt with.
1. Restart the Windows File Explorer:
Let’s start by going to the root of the problem. Since the Snipping Tool is a subset of the File Explorer service, it is most probable that the problem likely came from there.
If File Explorer goes unresponsive, so too does the Snipping Tool. As such, restarting File Explorer may dislodge whatever’s keeping the Snipping Tool from working correctly.
To do this, press Ctrl + Alt + Del, then select Task Manager. Alternatively, you can press CTRL + Shift + ESC to jump directly into the Task Manager. Right-clicking on Windows Explorer in Task Manager.
Scroll down until you find Windows Explorer and right-click it. In the drop-down menu that appears, select Restart. You will notice your desktop will go through some weird changes while File Explorer restarts.
For example, the taskbar will vanish, and your desktop wallpaper will turn completely black. However, this is totally normal, as all of these elements rely on File Explorer.
When you restart the service, it forces all of these elements to restart too. Once everything looks okay again, try opening the Snipping Tool and using it.
2. Run Windows Update Troubleshooter:
Restarting the Windows File Explorer should have resolved the issue for 90% of people. If it didn’t, you can do two things: seek other ways to screen capture screenshots on your Windows PC or figure out why your Snipping Tool is not working.
If you’ve chosen the latter, try running the Windows Update Troubleshooter next. You can run it by following the instructions below:
- Open the Settings menu by pressing Win + I.
- Select Update and Security.
- From the panel on the left side, head to Troubleshoot > Additional Troubleshooters.
- Then, select the Windows Update Troubleshooter.
- Windows Update highlighted in Additional Troubleshooters
3. Look for Interfering Third-Party Software:
Sometimes, a program you’ve recently downloaded can interfere with the smooth running of the Snipping Tool. If you want to reach to the bottom of all this mystery, one way to know for sure is by following these steps given below:
- Type ‘System configuration’ is the Windows search bar and open the System Configuration panel.
- Switch to the Services tab on the top, and then select the option to hide all the Microsoft services at the bottom.
- system configuration
- Disable any service that you think might be interfering with the Snipping Tool.
- Once you disable it, try running the Snipping Tool once again. If it works properly, it means that the app was in conflict with the Snipping Tool. It should be kept disabled to keep the Snipping Tool on your Windows working properly.
4. Run the Scannow Tool:
If all else fails and your Snipping Tool still isn’t working, you can still use the scannow command to repair and restore the damaged files that cause it to malfunction.
You can achieve this with the help of the Command Prompt feature. Here is how you can do that:
- Type “Command Prompt” in the Windows Search bar and run it as administrator. To do this, either click on Run as Administrator on the right panel, or right-click the search result and click Run as Administrator.
- Once inside Command Prompt, type:
- sfc /scannow
- …and hit Enter.
- Once it’s done, type:
- snippingtool.exe
- …to launch the Snipping Tool manually. Check to see if the error still persists.
5. Permitting Snipping Tool to Run in the Background:
Snipping Tool also might not work if it lacks the necessary permission to run in the background. This means the app won’t work unless you are active in the app’s window.
To rectify this, authorize the Snipping Tool’s application to run in the background by following these steps:
- Click the Windows icon and select Settings from the context menu.
- Hit the Privacy button on the Settings page.
- Scroll down to the panel on the left to locate Background apps.
- Search for Snip & Sketch from the app list and ensure it’s toggled on.
- List of Background Apps
6. Update Graphics Drivers:
Sometimes outdated or corrupt graphic drivers are the culprit behind a non-functioning Snipping Tool. Their core responsibility is capturing and processing the screenshot into a format the Windows device understands.
If it’s outdated, it won’t translate the images appropriately and become incompatible with your computer, resulting in the “Snipping Tool not working” error.
Hence, in this scenario, the key is to update these drivers to their latest build. To do this:
- Right-click on the Windows icon and select Device Manager from the pop-up list.
- Navigate to Display adapters, expand it, and right-click on the available driver.
- Select Update driver > Search automatically for drivers. The system will quickly scan for any available drivers and install them.
- Update Graphics Driver
- Restart your Windows device.
How to Fix Snipping Tool Not Working on Windows 10?
Snipping Tool is an easy-to-use screenshot utility on Windows operating systems. However, some users report Windows 10 Snipping Tool not working.
The snipping tool has suddenly stopped working on one desktop PC with Windows 10 using both Chrome and Edge. When ‘New’ or a mode is selected, the screen goes either black or grey. When the issue “Snipping Tool not working” happens, please first relaunch the screen utility and see if it works again.
If not, the possible causes that lead to the issue include corrupted system files, software conflict, etc., and based on these causes, we recommend that you carry out the following solutions.
Fix 1: Restart Windows File Explorer:
If the File Explorer of your system is stuck in an error state, the Snipping Tool may not work as expected. In this case, restarting File Explorer through Task Manager can bring the Snipping Tool to work again.
Step 1:
Right-click your taskbar and then choose Task Manager.
Step 2:
- Find File Explorer, right-click it, and choose Restart.
- Now go to Snipping Tool and see if it works. If it still doesn’t work, restart your computer.
Fix 2: Run sfc/scannow:
If the first solution fails to work, then try running the sfc/scannow command to remove and repair the corrupted system files.
Step 1:
- Run Command Prompt (or Windows PowerShell) as administrator.
- Type Command Prompt into the Windows search bar.
- Right-click the search result and choose Run as administrator.
Step 2:
Once inside the Command Prompt window, type sfc/scannow and hit the Enter key to run it.
Step 3:
Type snippingtool.exe and hit the Enter key to launch the Snipping Tool.
Fix 3: Run Windows Update Troubleshooter:
If the issue “Windows 10 Snipping Tool not working” persists, try running the Windows Update Troubleshooter.
Step 1:
Right-click the Windows icon on the taskbar and choose Settings.
Step 2:
Click Update & security on the Settings window.
Step 3:
Switch to Troubleshoot on the left side, then click Windows Update on the right side, and click Run the troubleshooter.
4: Find out the Conflicting Software:
Is the issue “Snipping Tool not working Windows 10” solved? If not, the software you installed on your computer might conflict with Snipping Tool and cause the latter not to work.
Step 1:
Type system configuration into the Windows search bar and hit the Enter key to open System Configuration.
Step 2:
Once System Configuration opens, switch to the Services tab. Then, tick the checkbox for Hide all Microsoft services.
Step 3:
Disable the suspected services, especially related to the newly installed software.
Step 4:
Open the Snipping Tool and see if it works. If it works, it signifies that software conflict does exist and you should disable software that causes the conflict to ensure Snipping Tool works again.
That’s all about how to fix “Snipping Tool not working Windows 10”. Hope the four solutions can help you get rid of the issue.
How to Fix Snipping Tool Not Working on Windows 11?
The Snipping Tool holds the crown for the best screenshot tool for Windows OS, and for good reason. It’s efficient, the lightest of all existing alternatives, takes up very little disc space, and doesn’t clog your RAM.
However, the Snipping Tool isn’t perfect as it comes with its fair share of flaws and issues that cause major inconvenience. It may begin to malfunction or occasionally crash or freeze, leaving users in a state of frustration. Here, we have compiled some ways to fix the “Snipping tool not working” error on Windows 11 and resolve it for good.
1. Reset or Repair the Snipping Tool:
It is inevitable that once in a while, a bug might cause your programs or system files to malfunction. However, with Windows 11, it is now easier than ever to fix programs. You can simply troubleshoot and repair an application without any additional third-party software with these few steps:
- Open Windows Search by clicking on the search icon on the taskbar.
- Type Snipping Tool.
- Right-click on the Snipping Tool app and select App settings.
- repair option highlighted in snipping tool settings
- Scroll down to Reset and click on the Repair option. The system will attempt to repair the software.
- If repairing the app does not solve the issue, try resetting the app by clicking on Reset. However, keep in mind that by doing so, you’re going to lose all your app data.
2. Turn Off Focus Assist:
Focus Assist is a fantastic Windows feature that filters all unwanted notifications to help you get more done. However, this can cause problems with some helpful apps, such as the Snipping Tool, by preventing them from launching. You can disable Focus Assist from blocking Snipping Tool by:
- Head to Settings > Systems > Focus assist.
- In Focus Assist, select the Priority only option and click on the Customize priority list.
- add app option in priority list
- Here, under the Apps section, click on Add an app. Find the Snipping Tool from the list of apps and close the window.
- Try opening the Snipping Tool and check if it works now.
3. Use the Snip & Sketch Tool:
The Snipping Tool has been replaced by the new Snip & Sketch tool by Microsoft, and as a result, the former’s stopped working on many PCs.
The most straightforward solution is to use some other method for taking screenshots or upgrade to the more advanced Snip & Sketch tool manually. To do this:
- Find the Microsoft Store pinned on your Windows 11 taskbar and open it.
- Search Snip & Sketch.
- Click on the Get button which will prompt app installation.
- Once the app is installed, you can start using Snip & Sketch by selecting Open.
- You can also check out our in-depth guide on how to fully acquaint yourself with Snip & Sketch.
4. Perform a Clean Boot:
Another reason for the Snipping Tool to not work is interference from other apps or third-party programs, especially your antivirus software. Performing a clean boot can help you with this issue and get the screenshot tool working in no time. To perform a clean boot, you have to disable all the third-party services and programs. For this:
- Press Win + R to launch the Run dialog box.
- Type msconfig in search.
- In the System Configuration dialog box, go to the Services panel.
- Check the Hide all Microsoft services box and then click on Disable all button.
After you have disabled all these third-party services:
- Head over to the Startup tab and click on Open Task Manager
- Right-click on all third-party programs, one by one, and disable them.
- Click Ok on the System Configuration box.
- Restart your computer.
5. Disable Automatic Time:
Some users identified the jump to Windows 11 as the leading cause of Snipping Tool troubles. They pinned down this error on the latest Windows version, however, later, more testing revealed that the app would work perfectly fine on devices if Microsoft Store was not set to auto-update programs, hinting that the issue is due to expired certificates.
To fix the issue and continue grabbing screenshots, you can try these steps:
- Open Settings app.
- Navigate to Time & Language > Date & time.
- date and time in Windows settings
- Toggle the Set time automatically option to off.
- Now, press Change which will allow you to reset the value manually. You can select any random date before October 30, 2021, however, you don’t need to change the time.
- Hopefully, this would have straightened any issues you were facing with the Snipping Tool. Turn the Set time automatically to On if your app is working smoothly once again.
6. Use the Classic Snipping Tool:
If none of the above methods work, and you wish to use solely the Snipping Tool in Windows 11 without reverting to Windows 10, follow the steps below to utilize the Classic Windows 10 Snipping Tool.
- Open Settings > File Explorer.
- Head to the System drive partition (C:\).
- Next, open the Windows.old folder followed by the system32 folder.
- Here, you’ll find SnippingTool.exe. Double-click on this file to launch and use the classic Snipping Tool even in Windows 11.
7. Use Regedit:
The Snipping Tool is installed and enabled by default on the Windows 11 operating system, but the Software Restriction Policy prevents some users from using it, or in some cases, restricts them from being able to view the app in the File Explorer.
If you are also facing similar issues and completely confused about what to do next, here’s how what you can do as a last resort:
- Launch the Run dialog box by pressing Win + R on your keyboard.
- Type Regedit in the search box and press enter.
- This will prompt open a User Account Control window asking you permission to continue and make changes to your device. Select Yes and the Registry Editor will be displayed.
- Scroll down the Registry Editor until you spot HKEY_LOCAL_MACHINE & follow the path SOFTWARE > Policies > Microsoft.
- creating new key in registry editor
- Locate the TabletPC key. If it doesn’t exist, right-click on Microsoft, select New > Key, and name it TabletPC.
- Right-click on this newly created key TabletPC > New > DWORD (32-bit) Value and rename it to DisableSnippingTool.
- editing value for the DisableSnippingTool key
- Double-click on DisableSnippingTool and make sure the Value data is set to 0 with Hexadecimal option also selected.
- Close the Registry Editor, and try searching and opening the Snipping Tool. These steps will have reset and kick-started the app, allowing you to successfully take screenshots on your Windows 11.
Expanding More on the Snipping Tool:
Because the Snipping Tool is associated with taking screenshots, its importance can’t be understated. Screenshots are an easy way to communicate data and not being able to use this function can leave you in a lurch.
There’s no doubt about the Snipping Tool being an integral part of the Windows OS; therefore, it is also essential to make full use of this function.
Knowing all the useful tips and tricks, shortcuts, and how to make your own hotkeys will make it much easier to capture, edit, and save your screenshots on your Windows PC.


