

Have you ever faced the situation where Microsoft compatibility Telemetry consumed most of your disk space and has disabled your windows 10? If yes, then we are here to fix this issue of high disk usage by Microsoft Compatibility Telemetry pack.
Before we come up with solutions to this problem, let’s dig more in-depth as to what Microsoft compatibility telemetry is.
Microsoft Compatibility Telemetry is a service provided by Windows 10, which accommodates mostly the technical data on how the Windows devices and its related software is functioning and sends this data to Microsoft regularly to amplify the user experience by fixing the prospective issues that occur. This data assists the development team in improving Windows performance by fixing frequent bugs like high disk usage that causes trouble.
Although few people think that this tool is used by Microsoft to spy on its users, the company has already pledged that it collects data solely for development purposes and not to misuse user privacy.
But if you are still concerned about your privacy, you can get rid of this ‘data-collecting’ script quickly from your machine by reading the methods that we have suggested below for you. Play
If the Microsoft Compatibility Telemetry process has currently begun causing trouble like very high disk usage on your Windows 10 system, you don’t have to panic!
Read – Fix Error Your Windows License Will Expire Soon [FIXED].
We have listed below a couple of easy solutions to fix Microsoft Compatibility Telemetry issue:
Solution 1: Try Disabling Microsoft Compatibility Telemetry By using Group Policy Editor
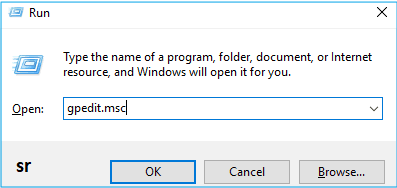
1. Initially, press the Windows logo key + R. Then start typing gpedit.msc and hit OK.
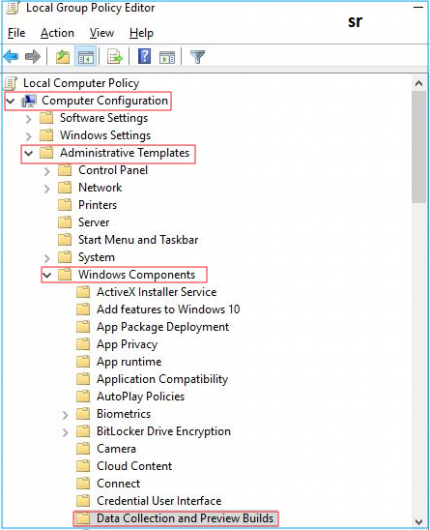
2. Next, open the group editor.
3. Now, go to Computer Configuration > Administrative Templates > Windows Components > Data Collection and Preview Builds.
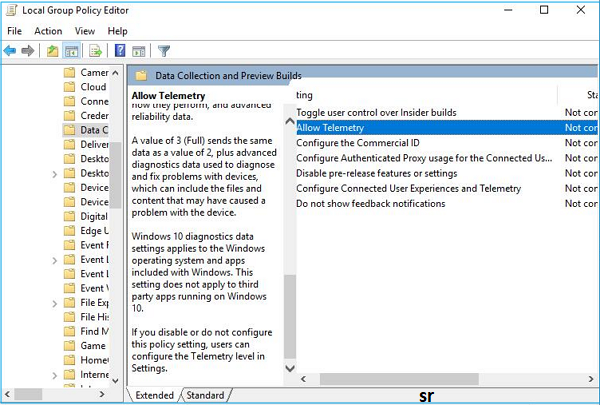
4. In that, double-click “Allow Telemetry.”
5. Choose Disabled, then hit OK.
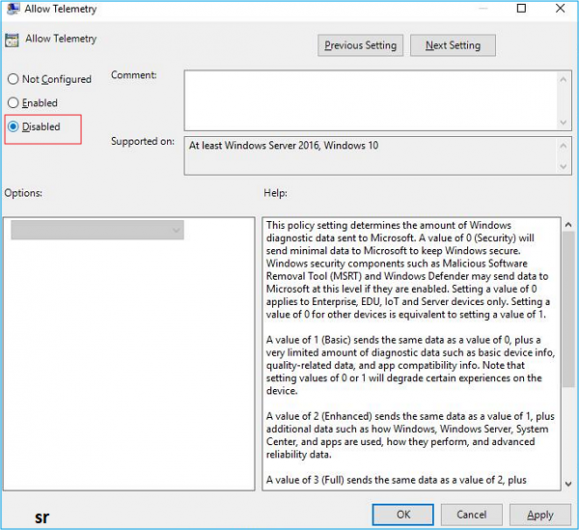
6. The idea is to disable the Telemetry to solve this problem, also called as disablewintracking.
7. Now, have a look at your task manager to check whether it functions or not. If this does not work very well, please choose the other solutions that I’ve stated below.
Solution 2: Use Registry Editor to Fix Microsoft Compatibility Telemetry High Disk Usage.
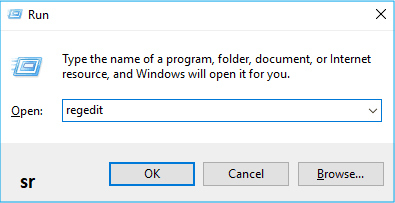
1. Click on the Windows logo key + R, then type “Regedit” in the box and hit OK.
2. Now, open the registry editor.
3. Remember to click YES when prompted by User Account Control.
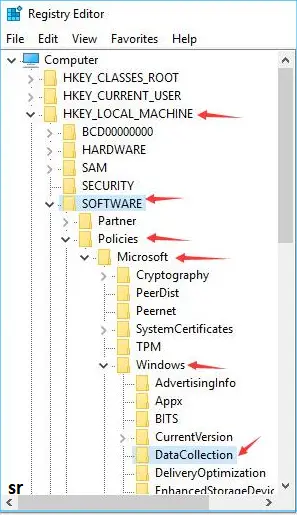
4. Now go to HKEY_LOCAL_MACHINE > SOFTWARE > Policies > Microsoft > Windows > DataCollection.
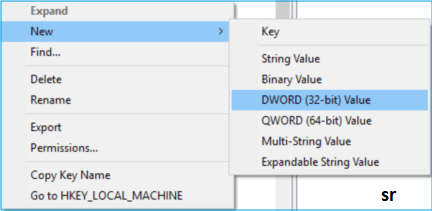
5. Next, right-click on Data Collection and choose New > DWORD (32-bit) Value. After right-click, name the new value Allow Telemetry. Now double-click on Allow Telemetry.
6. Now, right-click on data collection.
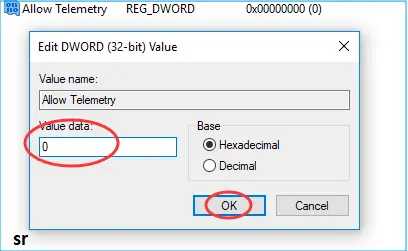
7. Set the Value date to 0 and hit OK.
Solution 3: Clean up the Running Memory (RAM) to Speed Up Your PC
I’m sure most of you have tried out above mentioned methods to fix Windows 10 Microsoft Compatibility Telemetry High Disk Usage issue. Even though those methods do not solve your problem and if your PC is still running slow, it’s high time to speed up your computer by cleaning up the running memory.
Clearing up running memory adequately will lower disk usage and make your PC work faster than usual. You must follow the simple below mentioned steps to solve this high disk usage issue. First of all, you should download the free clear up tool – EaseUS free partition software, then follow the steps below:
Step 1. Download EaseUS free partition tool and click on “Cleanup and Optimization”. Over there, you’ll find “Junk File Cleanup” and so many other options. Choose junk file cleanup.
Step 2. Now, Click on “Analyze” to assist the tool in finding the trash that consumes space on your PC. Analyze those junk files and try clearing up to fix high disk usage.
Step 3. Check thoroughly and choose the trash correctly that you want to clear up and then click on the “Clean up” option.
Finally, When you are done with all the steps, reboot your Windows 10. Check your Task Manager to see if the disk usage is normal or not.
Related – Fix Windows 10 Microsoft Compatibility Telemetry High Disk Usage [FIXED].
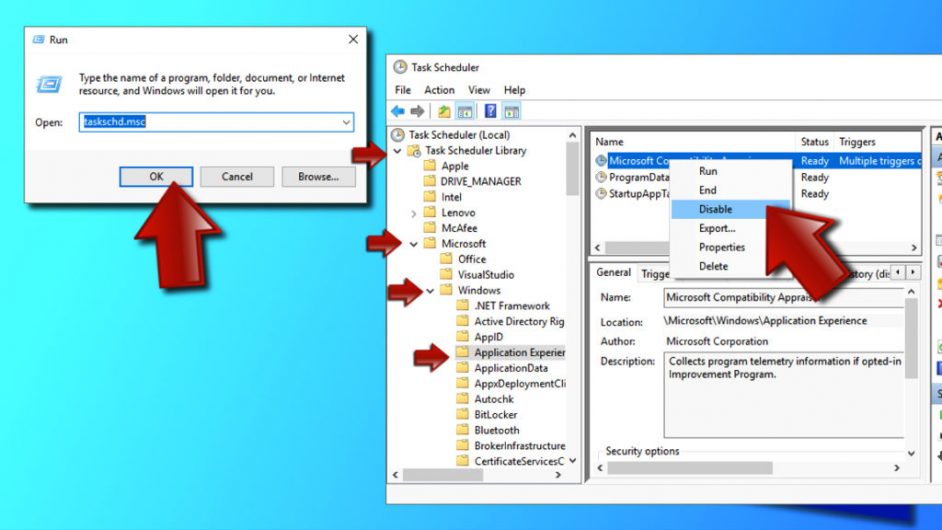
Solution 4: Disable CompatTelRunner.exe with the help of Task Scheduler
We do have a choice of disabling a particular process with the help of a task scheduler to deal with the Microsoft compatibility telemetry issue. Any process that is present in the task scheduler may have a fixed time set. After that elapsed time, the process will continue executing and will still be executed until the job is complete. You can always revert to a normal state and undo the changes using the above method if this doesn’t work properly for you.
- You can download the run application by pressing Windows + R. Furthermore, type “taskschd.msc” in the given dialogue box and hit Enter.
- Once you are in the task scheduler, try navigating to the file path mentioned below: Task Scheduler Library > Microsoft > Windows > Application Experience.
- Once you do that, you find a task named “Microsoft Compatibility Appraiser (CompatTelRunner.exe)” at the top of the entries listed.
- Now, right-click it and choose “Disable” from a couple of available options.
- Time to restart your computer and confirm if the usage has improvement or no. You can also check the usage by pressing Windows + R and typing “taskmgr” there.
If the issue of Microsoft compatibility telemetry Windows 7 or Windows 10 continues at this stage, you have an alternative of taking ownership of the process that is executable and rename/change permissions as per your wish so that it will not run automatically. But, please note that you compulsorily require administrative access to follow this particular solution.
Solution 4: Alternative
- Firstly, press Windows + E to download the File Explorer. Now, direct to the following file path:
- C:\Windows\System32
- Explore for the executable file named as “CompatTelRunnner.exe.” Right-click on that file and select Properties.
- Now, navigate to the Security tab. You’ll find “Advanced” at the near bottom of the window. Select that option.
- On the same side of the window, that is, at the near top of the window, you will find another option “Change” right in front of the owner. Click on that.
- Now, a new window appears asking you to choose between the User or Group for the owner. Press “Advanced.”
- Click on “Find Now.” This will list all the user groups in front of you. Choose your account from the list of items and hit “OK” for the chosen account to be added to the list.
- On clicking “OK”, the owner gets changed. Then press “Apply” on the window, which comes after clicking OK. Therefore, you officially become the owner of the file. Close the properties and open them again for the changes to be made.
- Once you open the properties again, click on “Change Permissions.” Now it’s time only to add “Modify and Change” permissions to the administrator mode. By doing this, you’ll be able to access the executable as, and when necessary, you will just have to open the permissions and add the “Execute” option to it. This executable will not be executed automatically as you took away all the permissions that are required for execution. In addition to that, try removing all the listed permissions to be on the safer side.
- Finally, restart your computer and confirm if the problem is fixed or not.
Note: You can also erase the executable if it keeps running continuously or renames it so that you can use it again in the future whenever necessary.
More – Ways to Fix Confirm Form Resubmission err_cache_miss [FIXED].
Summary
Microsoft Compatibility Telemetry is a self-working software. It just collects technical data and sends it to Microsoft to help the development team fix any issues that could be troublesome to your system by improving its performance.
The best part about Microsoft Compatibility Telemetry is that you can easily remove or disable this program as and when necessary. That way, it won’t collect any data, and you can free up a lot of disk space. Microsoft Compatibility Telemetry is unquestionably the best troubleshooter you can have for your system!


