
Got a 100% disk usage on your device? We will tell you how to fix 100 disk usage with the best possible solutions.
In Information Technology practice, many users report that their disk utilization reaches up to 100% many times, leading to a lagging, slow working, and unresponsive system.
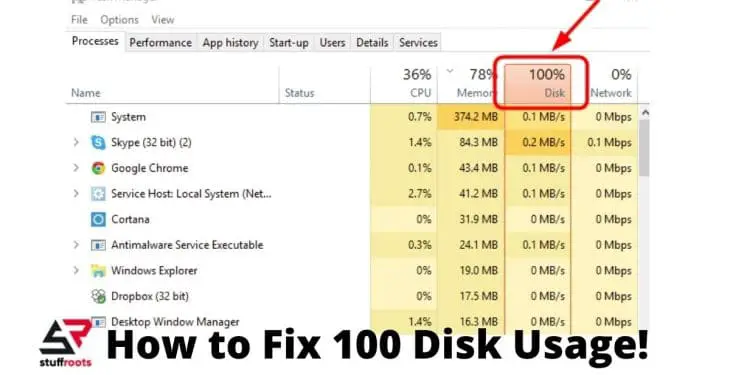
Windows users who experience such issues like slow response time on their computer device should look into their Task Manager for guidance and support. The Task Manager provides the user with a handful of information regarding the processes and systems that are currently running on the machine.
Among the ongoing tasks, you can also monitor with Task Manager is your computer’s disk usage as well.
If you see a disk usage of complete 100% on your machine’s disk, it means that it is maxed out and due to this your system’s performance will be degraded in the future. And to prevent this you need to take some serious and corrective action.
Many users who have recently upgraded have complained of their computers running slowly and the Task Manager reports 100% disk usage, and this all needs to be corrected as soon as possible.
The best possible solutions of how to fix 100 disk usage are,
Also Read: How to Fix Canon Error B200 for 2 and 4+ Cartridge Printers
1. Restart your System
The easiest solution to any technology-related problem is to give the system a rest and restart it. This simple step can resolve so many issues.
Be completely sure to use the “Restart” option which starts your system in a fresh state as opposed to the “Shut Down” option which preserves your system’s state and this may not resolve the disk issue that you are working to resolve.
2. Update your Windows System
Installing the latest updates which are available for your system can often resolve the mysterious problems with your Windows system.
To check if you are up to date on your system, do so by going into the “Update and security” section of the Windows Settings app.
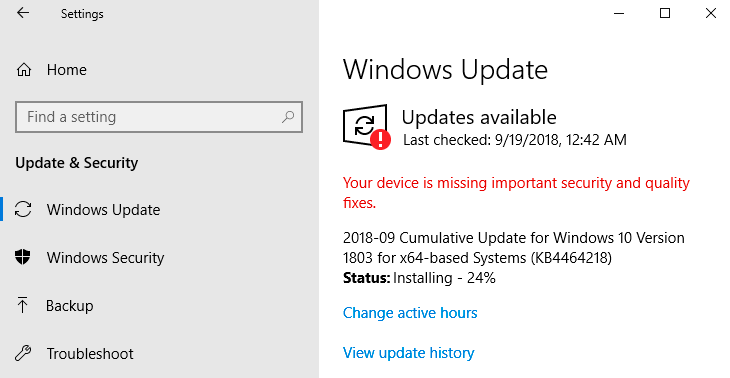
You can also check for new updates from here and install them if they are available.
Go to Settings and then to Update & Security settings, further to Windows Update.
This may or may not improve the overall performance of your system including that of your hard drive which shows 100% usage.
This can be a possible solution of how to fix 100 disk usage but you cannot be sure unless you try it yourself.
Also Read: How to Fix Earbuds- Best Solutions
3. Check your Malware and Anti-Virus
Your computer may be infected with malware that is causing your disk usage to spike. If you have antivirus software running in the background it should have caught the issue. Nothing is perfect though, so force your antivirus package to scan your hard drive for a potential infection.
This could be a time-consuming process since your disk is already experiencing high usage but might be necessary to identify and remove malicious software.
At the very least, tools such as Malwarebytes Anti-Malware should be able to scan your system drive and detect any problems, although with a heavy load on your drive already this may take a while.
If threats are found, use the software’s recommendations to discard them and reboot. Next, check your drive’s performance further. Hopefully, you’ve resolved the issue; if not, then malware wasn’t to blame, so read on.
4. Disable Windows Search
A known bug in Windows 8 and 10 can cause a search loop that can be the cause of your high disk usage. To temporarily stop the Windows Search facility and see if it improves your disk issue, open an admin prompt and enter the command: net.exe stop “Windows search”. This will stop Windows search from running until the next time Windows is restarted.
If it turns out that Windows Search was responsible for your Windows 10 disk usage reaching 100%, you can disable it permanently by following this procedure:
- Press WIN+R, enter services.msc, and hit Enter. In the Services window that opens find the Windows Search entry and double-click it to open the Windows Search Properties window.
- Under Startup type, select Disabled. Here you can click Stop to abort the service. Click OK to save your changes.
A few moments after disabling Windows Search, your Windows 10 performance should improve considerably and you have reached one step further in how to fix 100 disk usage.
Also Read: How to Fix a Slow Computer [9 Best Ways]
5. Disable Super Fetch Service
SuperFetch helps to decrease boot time and make must-load programs more efficiently. However, it has been identified as a potential cause of disk performance issues in Windows 8 and later versions of Windows, including Windows 10. Here’s how to stop this service:
- On your keyboard, press Windows logo key, type command prompt, then select Run as administrator.
- Click Yes at the User Account Control prompt.
- The command prompt will once again display. Type in the following command:
net.exe stop superfetch
- Hit Enter on your keyboard.
- If the command above isn’t valid, try the following one instead: net.exe stop sysmain
- Wait for a few minutes to see if your computer starts performing better. Or check your computer’s disk usage: Type “task manager” in the Windows search bar and select Task Manager, then in the Processes tab, look at the % at the top of the Disk column. If it’s no longer 100%, you’ve fixed the problem!
6. Disable Flash
Flash remains one of the most vulnerable aspects of modern computing and should be disabled. Adobe plans to kill off its multimedia plugin in 2020, so there’s little reason to keep using it.
Flash also seems to be one of the most common culprits for the 100% hard disk usage in Windows 10 if you’re using the Google Chrome browser.
Open Menu > Settings > Privacy and security and click the section marked Site Settings. Here, find Flash and set the toggle to Block sites from running Flash, then click Back.
Restart the browser and check your HDD performance.
7. Switch Web Browsers
Another cause could be the browser itself, particularly if you’re using Google Chrome.
The obvious option is to choose a different browser. Windows 10 already has two browsers built in. You probably don’t want to use Internet Explorer, but Microsoft Edge is an adequate replacement for Chrome.
8. Reset Virtual Memory
Virtual memory can be considered an extension of your computer’s physical memory. It’s a combination of RAM and a portion of your hard drive. When the RAM isn’t enough to perform a task, Windows will temporarily store files in virtual memory, then swap them back to RAM when required.
To reset virtual memory:
- On your keyboard, press Windows key and Pause/ Break key at the same time. Then choose Advanced System Settings on the left panel.
- Go to the Advanced tab, then click Settings.
- Go to the Advanced tab again, and choose Change… in the Virtual memory section.
- Ensure the Automatically manage paging file size for all drives checkbox is NOT ticked.
- Select your windows drive (the hard drive or partition that has Windows installed on it – usually C:), and enter an Initial size and Maximum size for your virtual memory:
- Initial size – This value varies, depending on your computer. If you’re not sure what value to use, just enter whatever the number is in the Recommended category.
- Maximum size – Don’t set this value too high. It should be about 1.5 times the size of your physical RAM. e.g. A PC with 4 GB (4096 MB) of RAM should have no more than about 6,144 MB virtual memory (4096 MB x 1.5).
Once you’ve entered your virtual memory values, click Set, then click OK to continue.
Also Read: How to Fix Confirm Form Resubmission err_cache_miss [FIXED]
there is little reason for your disk load to be anything close to 100%, certainly not under normal usage. A slow computer is one with a problem, and if you cannot fix it by disabling a browser plugin, stopping services, or running your antivirus software, then the problem may well be hardware related. Perhaps your drive is getting old; it may be defective, or the cables may need replacing.
If these methods don’t resolve your issue with 100% disk usage on your Windows 10 computer, you may need to look into replacing your hard drive. One last thing to try is to disable any automatic defrag processes that are running as they may be causing you problems. In general, your hard drive should never be at 100% usage, so if it is, there is some reason for the condition. You need to fix the issue or risk a very slow moving computer.
Hope this helps!


