
In this article, you will find out how to format a SD card on mac. Are you trying to reformat your SD card but not sure how to do so with a Mac? Fortunately, it’s easy to format memory cards and other removable media using the built-in Disk Utility app.
Disk Utility allows you to erase the SD card’s contents, rename it, and change its file format to make it compatible for a Mac, PC, or both. This guide will show you how to format an SD card on a MacBook or Mac desktop computer.
There are times when an SD Card starts acting weird. Once you have backed up your data, the only sure-fire way of resetting the SD card is by formatting it. Here’s how to quickly format an SD card on Mac.
If you’re a long-time Mac user, you might be familiar with Disk Utility. It’s the app that lets you manage and format internal and external storage. While it works great for SSDs and hard drives, it’s a bit weird when it comes to formatting SD cards.
Thankfully, there’s a quicker and easier way to format an SD card. SD Association’s own SD Card Formatter app lets you format an SD card in just a couple of clicks. The application supports SD/SDHC/SDXC cards.
Insert the SD card into the SD card slot on your Mac. This will allow you to format an SD card using Apple’s built-in Disk Utility app. Some Macs have built-in SD card slots, which support the following types of SD media: MMC, Default Speed, High Speed, UHS-I, UHS-II.
If your Mac doesn’t have an SD card slot, you can purchase a USB-C SD card reader that connects to your Mac. You’ll find an SD slot on the following Macs:
- Mac Studio (2022)
- MacBook Pro (2021 and later, and 2011-2015)
- Mac Mini (2011-2014)
- MacBook Air (13-inch models from 2013-2017)
- iMac (27″ and 21.5″ models from 2010 and later)
If your SD card is too small to fit into the SD slot, such as a MiniSD or MicroSD card, you can insert it into an SD adapter to make it fit into the slot. When shopping for an adapter, look for “MiniSD to SD adapter” or “MicroSD to SD adapter.”
Reformatting your SD card will completely erase its contents. Copy its files to a new location on your computer if they need to be saved.
Read Article: How to Play Pokémon Emulator iPhone?
THINGS TO REMEMBER BEFORE YOU BEGIN:
Before formatting your SD card on Mac, ensure you have taken a backup of the SD card data on your Mac, iCloud, Google Drive, or OneDrive. Also, check whether the SD card is physically unlocked or not.
There’s a small slider switch on your SD card, which helps lock it to prevent modification or deletion of data. Ensure that the switch is set to an unlocked position.
FORMAT SD CARD ON MAC USING DISK UTILITY:
Disk Utility is an app that lets you take control of all your internal and external storage devices attached to your Mac. Disk Utility also helps check any storage errors that lead to the malfunctioning apps on your Mac. It comes pre-installed on your Mac and is our first recommendation for formatting your SD card. Here’s how to use it.
Step 1: Connect the SD card with your Mac:
Step 2: Press Command + Spacebar to open Spotlight Search, type Disk Utility, and press Return:
Step 3: When the Disk Utility window appears, click on your SD card name from the left menu:
You will see all the storage info about your SD card on the right side.
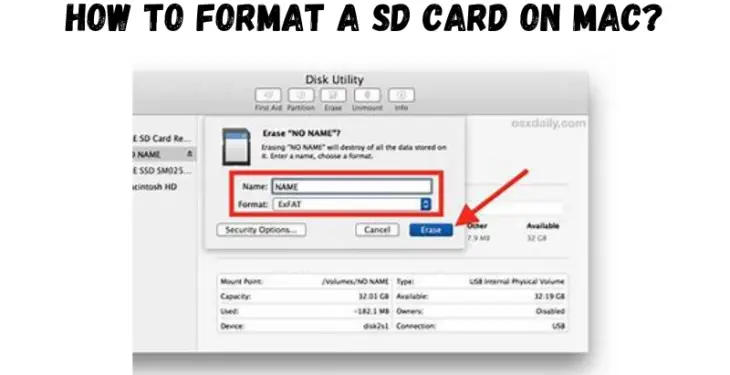
Step 4: Click on Erase option in the top-right corner:
The Erase window will open your screen. You can choose to rename your SD card.
Step 5: Click the drop-down menu next to Format to select SD card format:
For a 32GB SD card, if you don’t plan to store any file that’s more than 4GB, select MS-DOS (FAT). For an SD card with storage higher than 32GB, select exFAT.
Step 6: After selecting the format, click on Erase:
FORMAT SD CARD ON MAC USING SD CARD FORMATTER:
The SD Card Formatter is a free software available to format the SD cards easily on Mac. You can download and install SD Card Formatter from the official SD Card Association website.
Do note that M1 Mac users might be asked to install Rosetta to open the SD Card Formatter. Also, while downloading SD Card Formatter, you will have to accept the End User License Agreement just like you do for any other software. After downloading the SD Card Formatter, here’s how to use it on your Mac.
Step 1: Connect the SD card with your Mac:
Step 2: Press Command + Spacebar to open Spotlight Search, type SD Card Formatter, and press Return:
Step 3: Once the SD Card Formatter opens, it will automatically detect your SD card and fetch all its details:
You don’t have to select the Format as it will be picked up by the software automatically.
Step 4: Click on Format at the bottom to start the process:
FORMAT SD CARD ON MAC USING TERMINAL:
Lastly, you can also use the Terminal app on your Mac to format an SD card. This process requires more attention to detail. Here’s how to do it.
Step 1: Connect your SD card with your Mac:
Step 2: Press Command + Spacebar to open Spotlight Search, type Terminal, and press Return:
Step 3: Once the Terminal app opens, type the following command and press Return:
You will notice that the information related to all the internal and external drives connected to your Mac will appear in Terminal.
Step 4: Look for Type Name and Identifier sections for your SD card:
Step 5: Type the following command by mentioning the Type Name and Identifier of your SD card:
Then, press Return. Of course, the path of the SD card will differ, so make sure you use that before running the command.
Step 6: Enter the user password of your Mac and press Return:
This will begin the process of formatting your SD card. And once it’s complete, you’ll see a regular prompt.
EASILY FORMAT SD CARD ON MAC:
Formatting your SD card helps in saving storage space. Once you connect the SD card with your Mac, it will show up on the Finder to access your data.
If the SD card stops appearing in Finder on Mac, accessing your data will be difficult. Refer to our guide to fix SD Cards not showing up on Mac.
Open Disk Utility on your Mac:
This app allows you to erase and reformat your SD card. To open the app:
Press Command + Spacebar at the same time and type disk utility.
Click Disk Utility to open it on your Mac.
Select your SD card in the left menu:
This will open a new page with options.
If you don’t see a list of disks, go to View > Show All Devices to open the list.
Click the Erase button:
It is a small drive icon with an X on it at the top of the app. A pop-up menu will appear for erasing the SD card.
Type a name for your SD card:
This is how your SD card will appear when you insert it into a computer, phone, or tablet.
Select a format for your SD card:
Click the drop-down menu next to “Format” to choose one of the following format options:
If you plan to use the SD card in various devices, including digital cameras, Macs, PCs, and/or phones, choose exFAT as the format. This ensures that your SD card is compatible with the widest variety of devices, including your Mac. If you are only going to use the SD card on computers running macOS, you can choose MacOS Extended (Journaled).
Click Erase to format your SD card:
This erases and formats your memory card. Once the format is complete, click Done to continue. You can now eject the card from your Mac by clicking the eject button next to its name in the Disk Utility app.


