

Let’s say you’re working on a very important document on your precious and beloved Mac computer and you come across an article or webpage that enlightens you from the within. It is so good that now you want to save it as a permanent copy. Unfortunately, you cannot download web pages just like that. It’s a real pain! In that case, the immediate thought that crosses your mind is of taking a screenshot. But unfortunately, you are one of those newcomers who do have not a clue about how macOS works and how to take a screenshot on Mac. You search the web for hours on ‘how to take a screenshot on Mac’ and stumble upon this article. Let’s check out how to take a screenshot on Mac in this article.

Image credit: greatecno.com
The same can be the case for a really good photo or just a snapshot of your screen that you desire to save on to your permanent storage. Now, you’re in luck, because we bring you a concise and crystal clear guide on how to take screenshot on Mac.
Related – How to Take a Screenshot on Windows [Proper Guide].
Apple has a history of offering excellent features since its very launch. And the same applies to this handy yet straightforward feature of taking screenshots. Unlike other computers, on an Apple device, you can directly take the screenshot of the entire screen or just a small part of the screen, without having to install any third-party plugins. Also, you can capture a single window among the multiple applications’ windows open on the desktop. Well, let us explore all of these three options in great detail.
How to Take a Screenshot on Mac?
To take a simple and a very basic screenshot, that is the screenshot of the entire screen; you can follow the steps given below:
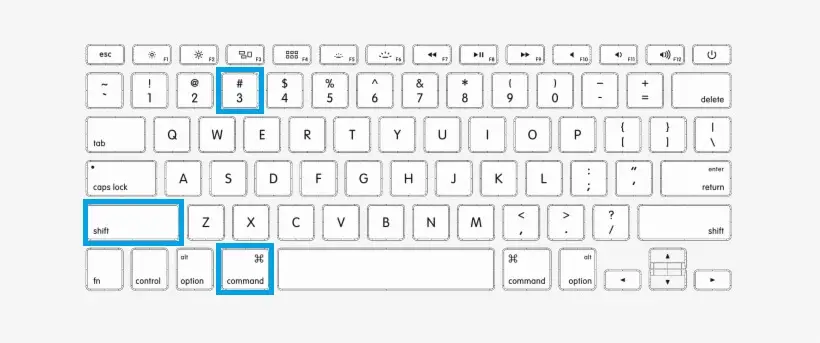
- To take a screenshot, press and hold the Shift, Command, and 3 key together at the same time.
- After that, you will see a thumbnail in the bottom corner of your screen.
- You can click on it to edit the screenshot. Or, you may wait for the screenshot to save to your desktop and edit it then after.
Read – How to Install an SSD in PC and Laptop.
How to Take a Screenshot on Mac of a Particular Part of the Screen?
This is a more advanced option for taking a screenshot on the Mac as compared to the last one. This can be said on behalf of the fact that the choice we are going to look at allows you to capture a specific part of the screen, allowing you to exclude whatever you would not like to add in your screenshot. How cool is that!
Well, to do the same, you need to know the appropriate steps, which are given below:

- Press and hold the Shift, Command, and 4 keys together at the same time.
- After doing that, drag the crosshair-like figure to select the area of the screen that you wish to capture.
- If for some reason you want to move the selection, you can do it by pressing and holding the Space bar while dragging the cross-hair. To cancel taking the screenshot, you can press the Esc (Escape) key.
- Next, to take the screenshot, release the left mouse button or trackpad button if you are on a laptop.
- To edit the screenshot immediately, click the thumbnail you observe in the corner of your screen. This will open up the menu for editing the screenshot. Or, you wait for the screenshot to save to your desktop.
More – How to Fix Windows 10 Keyboard Not Working [FIXED].
How to Screenshot On Mac of a Particular Window or Menu?
This is the most advanced option for our quest of how to screenshot on Mac, among all the three (as they say, last but not the least!). The option has been designed by the developers in such a way, that you can take the screenshot of a particular Window, excluding all other contents being displayed on the monitor. This can be of great help when you are trying to drag the attention of the viewer to whatever you are typing. Or you can be writing an article like this and would like to add photos just as we did right here!
Anyway, whatever the case may be, you firstly need to memorize the steps. Here you go:

- Firstly, you need to open the window or menu that you want to capture (pretty obvious!).
- Next, press and hold the Shift, Command, 4, and Space bar keys together at the same time.
- Now, the pointer changes to a camera-like icon.
- If at this point you wish to exit for some reason, you can always cancel taking the screenshot, by pressing the Esc (Escape) key.
- Now, click on the respective window or the menu you desire to capture.
- If you do not like the window’s shadow and want to exclude it from the screenshot, you ought to press and hold the Option key while you click on the window or menu.
- Similar to the previous options, if you want to edit the screenshot right now, you can click on the thumbnail you see in the corner of your screen. Or, you may wait for the screenshot to save to your desktop, and then you can add your creativity.
Where to Find the Screenshots?
Okay, so you have followed all the instructions obediently, and have taken all the screenshots you wanted to, but there is a problem which still persists. You do not know where to find all those beautiful screenshots. Well then, worry not, because we are going to learn just that right now.
You can find all the screenshots you clicked conveniently organized on your desktop. Yes, it’s that simple!
Also – Top 7 Fast Copying Software for Mac and Windows.
Conclusion

Image credit: Techsviewer.com
So, now you know how to take a screenshot on Mac devices. We brought you three different ways, all with various features, for you to use according to your inclinations and needs of the hour. We hope that you found this article very helpful and all your doubts have been completely cleared. So that’s it for now, now take some screenshots!


