

Imagine you just made up your mind to upgrade your PC as it is a bit too old to run PUBG, Fortnite, and Apex. You head over to the internet and look for the best components available out there, as you have a thick wallet in your pocket. After researching for quite some time, you realize that you realize that for picking up the part that will fit just right, you need to know your computer’s model number. Sadly, you did not memorize it before throwing away the box! This problem specifically arises in pre-built gaming PCs or even low-profile laptops. Or, it might be that your beloved computer has unfortunately started malfunctioning, and to register a complaint, you have to send them the model number of your computer as well. In such a situation, you would head straight to the internet and hunt for a solution.
How to Find Model Number of Your Computer
Microsoft developers took care of this, and you can find out your PC’s model number from System Information, Command Prompt, and Power Shell. And if that hunt brought you here, then you’re in luck, because we bring you not one, not two, but three different ways to find out your computer’s model number. Let’s jump right in.
Using the System Information Panel
This is the first method to check your PC’s model number within Windows itself. System Information, as the name suggests, displays a list of all properties of your computer, including OS name, OS version, System Name, System Manufacturer, System SKU, Processor, and so much more. This the best possible way to search for any specific detail about your device, no matter how minor.
As for the steps, here you go:
- Click on the Start Menu to open it.
- Click on the Search Bar.
- Type in System Information.
- Click on the first option that pops up.
- Now, in the System Information window, click on the System Summary option.
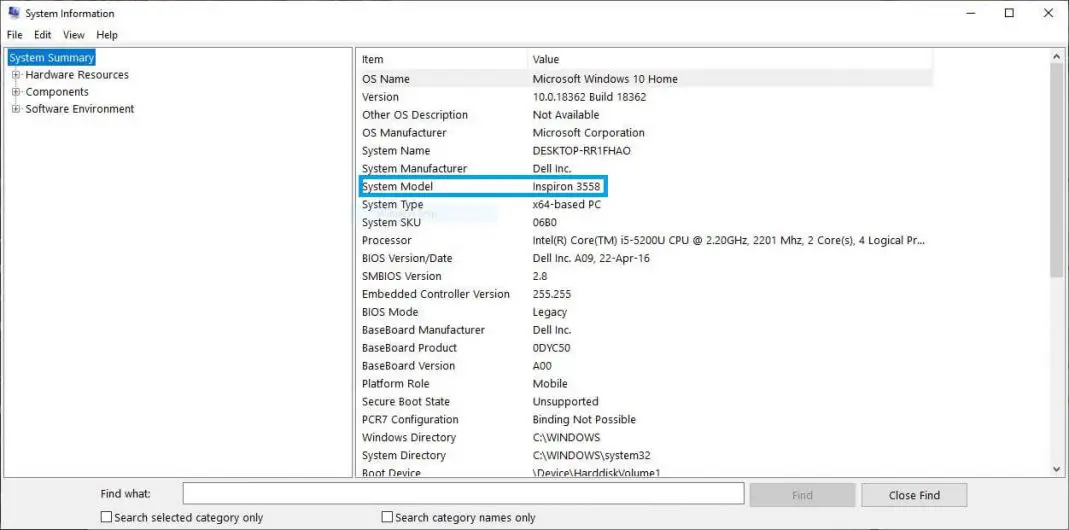
Observe to find the System Model option (it is generally the 7th field from the top, under the System Manufacturer field).
Using the Command Prompt
Now its time to put our typing skills to work. Over here, we are going to use the Windows Command Prompt Feature. Basically, it is a command-line interface that allows you to execute handwritten commands in the syntax supported by Windows. You can do everything over here that you can do using the User Interface – provided you know all the commands. It was specifically added by the developers to make troubleshooting easy, with the help of the age-old hacker-style interface.
To figure out your model number of your computer with the help of the Command Prompt option, follow as given below:
- Open up the Start Menu.
- Type Command Prompt in the search box.
- Right-click on the first option.
- From the submenu that appears, click on the run as administrator.
- Hit yes when asked for confirmation.
- After the Windows Command Prompt window open in front of you, type in the following command: “wmic csproduct get name”
- Press the Enter Key.
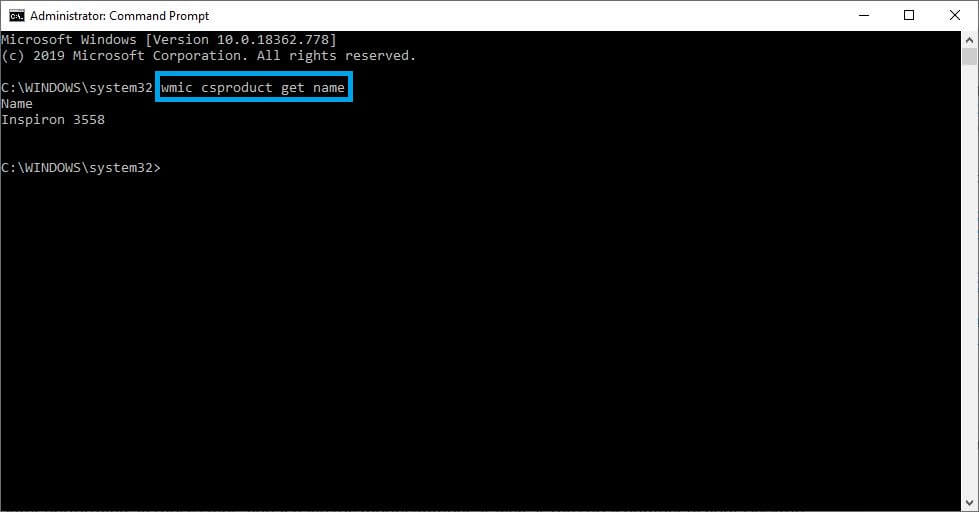
You will be presented with the model number.
Let’s just make sure that this is our model number of your computer. For that follow along:
- Open up Command Prompt again, as instructed above.
- Type in the following command and then hit Enter: “wmic csproduct get name, identifyingnumber”
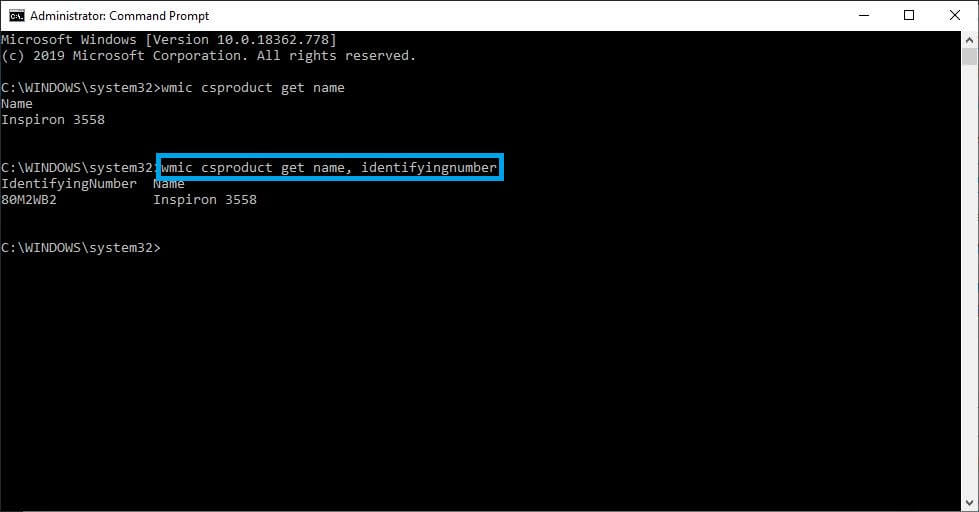
After performing all those steps, you’ll have the model number as well as the serial number of your Desktop, Laptop, Tablet, etc., depending on which one you are using.
Using Windows Power Shell
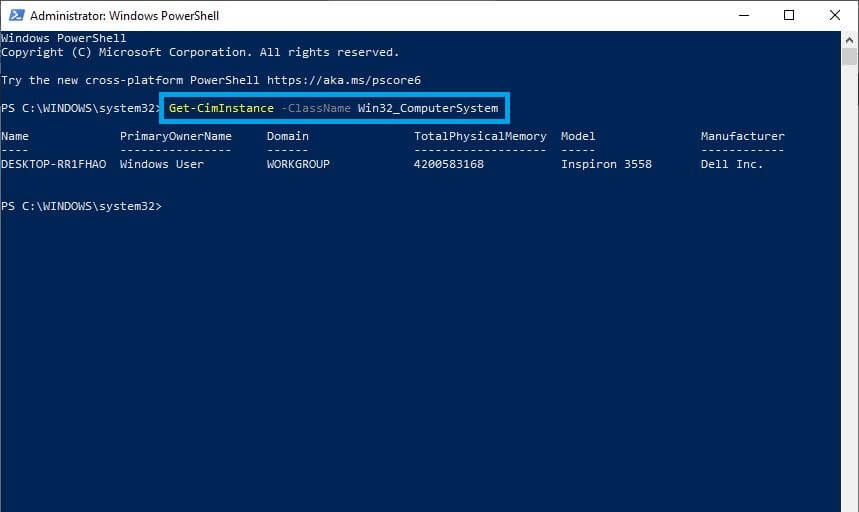
If you possess deep knowledge about computers, then you must be familiar with the Power Shell feature in Windows. And it is just the thing we’re going to use over here to find the model number of your PC.
Feel free to follow along in your own computer as well:
- Open up the Start Menu.
- Search for Power Shell in the search bar.
- Enter the following command in the interface and hit the Enter key: “Get-CimInstance -ClassName Win32_ComputerSystem”
- Find the model number under the ‘Model’ field.
More – Fix Error Your Windows License Will Expire Soon [FIXED].
Conclusion:
And just like that, you have found yourselves the model name along with some other interesting details about your computers. Now, be it a new graphics card, a power supply or RAM, you know how to find just the right one using the model number of your computer. We looked at ways, first with the System Information option, second with the Windows Command Prompt, and the third with the Windows Power Shell. Although all of them work equally well, we suggest using the System Information option.
Not only it does NOT require any fancy coding and all that, but also you would not be dealing with funny looking errors if you manage to screw something up. But if you know what you are doing, you are most welcome to use any of the three options.
Though we have focused on Windows 10 in this article, any Windows version above Windows XP will support all these options.
For more details, you can also pay a visit to Microsoft’s official website:
https://www.microsoft.com/en-in
Go get your computer’s model number of your computer now!


